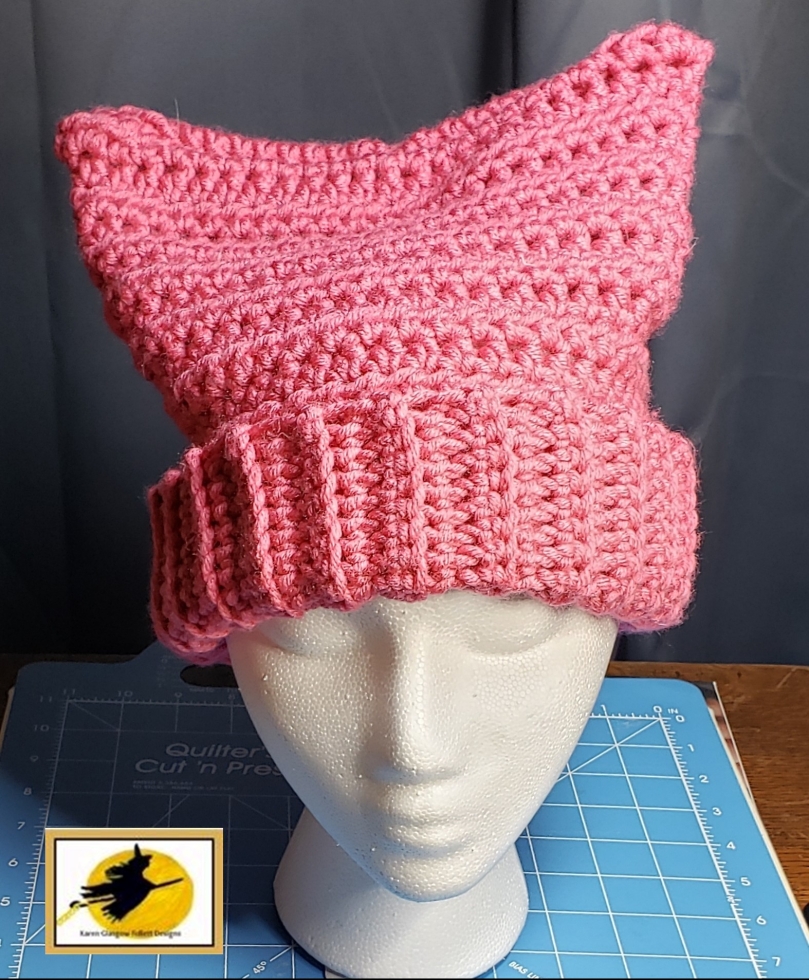
Pussy Cat Hat in Crochet

pussyhat120

Materials

1 skein bulky (5) weight yarn

Crochet hook size “K” / 6.5mm

Large eye needle to weave in ends

And to sew up seams

 Stitches Used

Ch – Chain

Sc – Single Crochet

BLO – Back loop only

HDC – Half double crochet

 Special note

The hat is worked in rows and then seamed up the back and across the top.

 Pattern

Hat Ribbing

Ch 16,

Row 1, Sc in the 2nd ch from the hook and in each ch across

             (15) Turn

Rows 2 – 47, Ch 1, Work 1 Sc in BLO of each stitch across

                      (15) Turn

Hat body

Turn ribbing 90 Degrees,

Row 1, Ch 1 (does not count as a stitch now and   

             Throughout) Evenly space 47 HDC along

             Side of ribbing length. Turn

Row 2 – 13, Ch 1, Work 1 HDC in each stitch across

                     (47) Turn

Row 14,  Ch 1, Work 1 sc in each of the next 9 stitches

                *Work 1 hdc in the next stitch,

                   Work 2 hdc in each of the next 3 stitches,

                   Work 1 hdc in the next stitch,*

                   Work 1 sc in each of the next 19 stitches

                   Repeat from * to *

                   Work 1 sc in each of the remaining 9 stitches.

                   (53 stitches)  Cut and secure yarn.

Seam up the back. Center the back seam to the center stitch (stitch 27) of the top. Seam the top, matching stitch for stitch.  Turn right side out and enjoy!

 Cpr. Revised January 2020 KarenGlasgowFollettDesigns


Hooped Art – The Multi – Maker Way

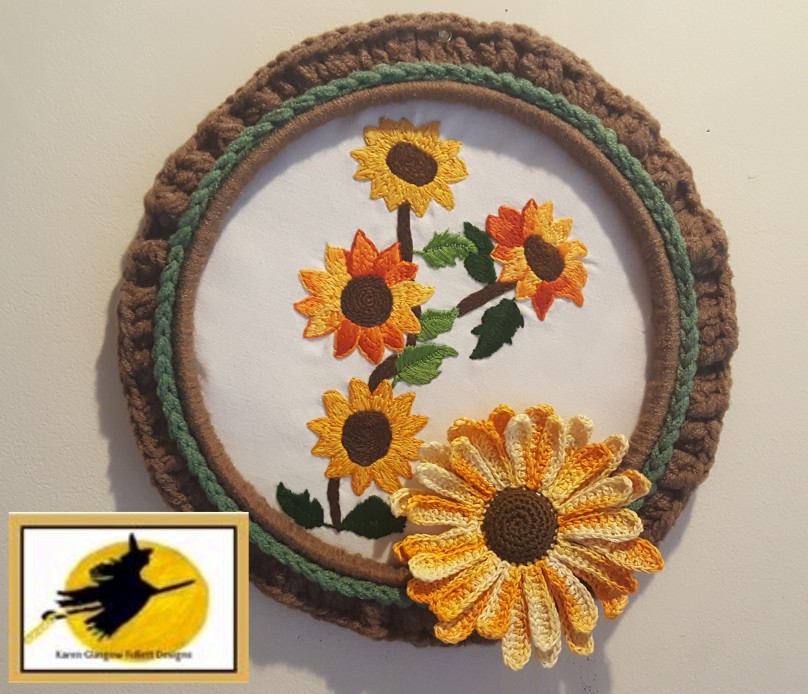
sunflowerwreath

I love hooped needleart. It’s casual. It’s beautiful. It’s expressive. But, sometimes, it can use a bit of “up – crafting.”

I recently saw an entire arrangement of hooped needleart. The designs were gorgeous and perfectly executed. But, it seemed disjointed … floaty. For my aesthetic, it was wanting some “look at me” element. It was wanting the perfect frame for the perfect art.

crochethoops

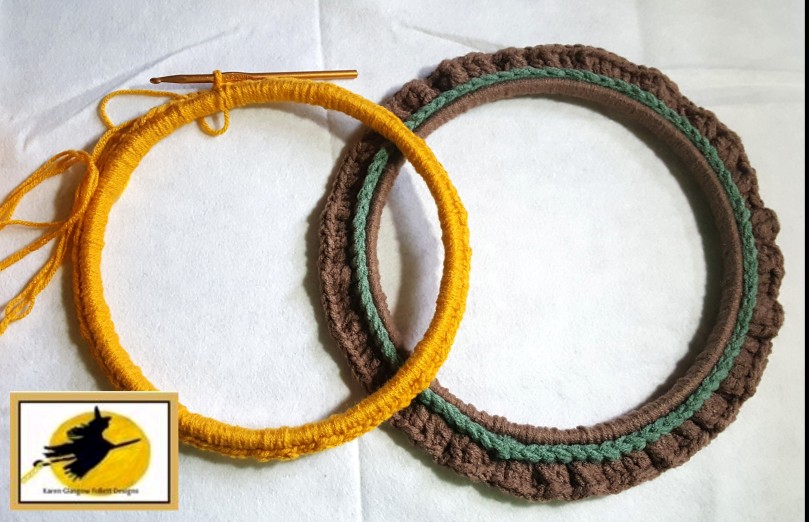
As an embroiderist, I have amassed a huge collection of wooden embroidery hoops. To begin this particular project, I selected a 10 inch hoop. (this is now a needlecrafted “wreath” on my front door, so I wanted a larger hoop) Taking 3 strands of worsted weight (4 weight) acrylic yarn and a 6.5mm crochet hook, I snugged as many single crochet stitches that would fit around this hoop. (as shown in both hoops)

Since this piece is on my white front door, I wanted a more “look at me” factor with the framing hoop. So after joining the last single crochet to the back loop of the beginning single crochet, I worked 2 double crochet stitches in the back loops of each single crochet around. I cut and secured the yarn to the beginning double crochet and hid the yarn ends.

To make the inner “mat” of the hoop frame, I attached 3 strands of green to a front loop of the initial single crochet round. I then made a single crochet in the front loop of each single crochet around. After securing, cutting and weaving in the yarn ends – this hoop frame was ready for it’s embroidered face.

sunflowerwreath

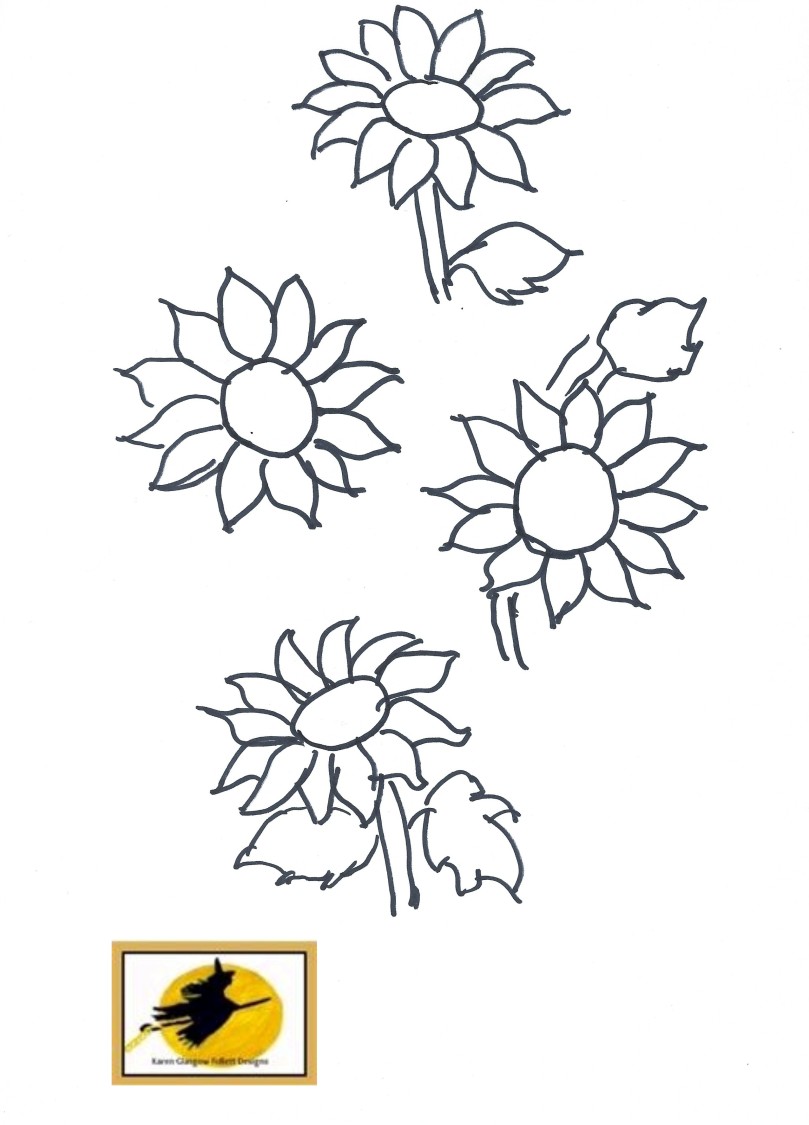
Its just impossible to have an Autumn adornment without paying homage to the wonderful sunflower. (especially if you live in Kansas, USA – like I do) The pattern for the embroidery will be added at the end of this piece. The pattern for the crocheted sunflower is a paid pattern that is available on my Ravelry, Etsy or Craftsy site (links provided at the end of the piece too)

Personally, I like a nice and tightly woven Kona cotton for embroidery, but I have also been known to pick up linen and cotton napkins at garage and estate sales to use as embroidery backgrounds, Regardless of where I purchase and what I use, I begin by ironing the fabric and starching if needed. Using your hoop frame, mark the fabric “lightly” the circumference of the interior hoop. This gives you your design field. Transfer your design. You will notice that I drew each sunflower seperately. You can postition as you choose to create the design of your choice.

Using 6 strands of embroidery floss (DMC used for this piece) I worked the piece from the background to the forground. I used split stitches in browns for the branches. The leaves were done in closed fly stitches. The petals were done in long and short stitch. AND the flower face was done in a circular pattern of chain stitches. Block and press as needed

To finish – choose a backing fabric (I chose felt) Cut a size that you will be able to stitch or glue to the back of your hoop frame. (in this case, it was the size of a 10 inch dinner plate). Use an adhesive spray or a fusable to attach the embroidered piece to the backing fabric. Cut the backing fabric and the embroidered face to fit the hooped frame. Hand stitch or glue to the back of the hooped frame.

Since I wanted another layer of dimension, I crocheted the sunflower and stitched it slightly offside of the bottom of the finished piece. If you want to layer in this manner, but do not want to crochet, most craft stores are abundant in their stash of silk flowers that can be cut and attached.

Now you have the Hooped art that is completely original to you and your “multi – making” craft aesthetic.

Links to the crochet pattern

https://www.craftsy.com/search?query=karen%20glasgow%20follett

https://www.etsy.com/shop/MysticalCraftDesigns

https://www.ravelry.com/patterns/sources/karen-glasgow-folletts-ravelry-store/patterns

Sunflower Embroidery Pattern

sunflowerembroidery

cpr. Karen Glasgow Follett Designs 2018

Crochet Gown Vintage 5 inch “Tiny Teen” Doll

Crochet Gown For 5 inch Vintage Tiny Teen Doll


Collectors are a determined breed of people. We will quest, ad infinitum, for that desired piece to add to our collection. Doll collectors take this determination to an even higher level, as, more often than not, we are questing for the dolls, the clothing and other accessories that belong to a particular doll. There are times that finding a “complete doll” is as rare as finding a unicorn with our “complete doll” perched on top.

I am a baby boomer age collector. Most of the dolls I collect are the dolls from my childhood. This pattern is to create a gown for one of my collecting favs – the 5 inch Tiny Teen doll.

 Materials Needed

1 Ball Size 10 Crochet Cotton Thread

1 Size “7” (1.65mm) steel crochet hook

2 approximately 4mm pearl beads

Tapestry needle (or other larger eye needle)

Small sewing Needle (needs to fit through the bead hole)

Sewing thread.

Scissors

 Stitches Used

Sc – Single crochet

Ch – Chain

Dec – Decrease                                              

Sl st – Slip Stitch

Dc – Double crochet


 Pattern

 Gown Top

Ch 21,

 Row 1; Work 1 sc in the 2nd ch from the hook and in each ch across. (20) Turn (mark as the right side)

 Row 2; Ch 1, Work 1 sc in each sc across. (20) Turn

 Row 3; Ch 1, Work 1 sc in each of the next 3 stitches. Ch 7, skip 2 stitches,  Work 1 sc in the next 10 stitches. Ch 7, skip 2 stitches,Work 1 sc in each of the remaining 3 stitches.

 Row 4; *You will be working in to each chain stitch of the ch 7 arm openings* Ch 1, Work 1 sc in each of the first 2 stitches. Work a sc dec through the  next 2 Stitches. Work 1 sc in each of the next 5 stitches. Work a sc dec through the next  2 stitches. Work 1 sc in each of the next 8 stitches. Work a sc dec through the next 2 stitches. Work 1 sc in each of the next 5 stitches. Work a sc dec through the next 2 stitches. Work 1 sc in each of the remaining 2 stitches. (Turn)


Row 5; Ch 1, Work 1 sc in each of the next 8 stitches. *(Work a sc dec through the next 2 stitches) 2 times.* Work 1 sc in each of the next 2 stitches. Repeat from * to *. Work 1 sc in each of the remaining 2 stitches.

Cut and secure thread.


Skirt (worked in rounds)

 With Right side of top facing you, Join thread with a sl st. Work 1 sl st in each of the stitches across. With Right side of top facing in, join to beginning sl st with a sl st.

 Rnd 1; Ch 2 (does not count as a stitch now and throughout) Work 2 dc in each sl st Around. (40) Join to the beginning dc with a sl st

 Rnd 2 -6; Ch 2, Work 1 dc in each stitch around. (40) Join to beginning dc with a sl st.

 Rnd 7; Ch 2, *Work 1 dc in each of the next 4 stitches, Work 2 dc in the next stitch.* Repeat from * to * around. (48) Join to beginning dc with a sl st.

 Rnd 8 – 9;  Ch 2, Work 1 dc in each stitch around. (48) Join to beginning dc with a sl st. *if you want a longer skirt, work another round*

 Rnd 10; Ch 1, Work a sc in each stitch around. Join to beginning stitch with a sl st. (48)

 Cut and secure thread.


Neckline

Turn the gown to right side facing out.

 Attach thread to the top left side of the neckline (top of the “V” opening in the back)  with a sl st. Work 1 st sl  AROUND THE POST of each stitch of the top’s row 5.

After working the last sl st on the top right side of neckline, Ch 5 (this acts as a loop for the “bead button”) sl st in the same stitch.

Work 4 more sl st down this same side of the “V” opening in the back.  Ch 5, sl st in the same stitch.

Work a slp st in the base of the “V,” Evenly space 5 sl st along remaining side of the “V” to Top of gown. Join to beginning sl st.

 Cut and secure thread.

  Sew each bead / button in place opposite of loops.

Weave in all ends.

witchtiny 128x160

Cpr Karen Glasgow Follett 2018


Crochet Beaded Flat Weave Bracelet / Cording

crochetbeadedfobSeveral months ago I posted (on my Facebook page, Karen  Glasgow Follett Designs) a Turkish Flat weave bracelet that I made.  The pattern for this bracelet created a lovely staggering of beads that ended in a loop and vintage button closure.

I wanted a pattern of flat weave beaded cording that had a bit more symmetry. The pattern that I devised creates a crochet “cording” that is symmetrical, reversible and would be great to use for bracelets, laniards, necklaces, – or as pictured – scissor fobs with attached tassel pincushion. (I got tired of losing embroidery scissors)


The materials that you will need include:

Size 10 (ish) crochet thread. I used a nylon thread that was a bit larger than a typical size 10

Size 7 (1.65 mm) steel crochet hook

Size 6 Seed beads (or bead sizing of your choosing) *The combination of hook, thread and bead sizing yields approximately 5 rows or 10 beads per inch*

Toggle or closures of choice

Large eye needle (to weave in ends and secure toggle or closures) You can use a sewing needle and thread if you wish to use a vintage button as a closure

Fabric glue

Scissors

Stitches Used

Chain – Ch

Bead chain – BCh (move a bead close to hook and work a chain stitch that will encompass the bead)

Single crochet  – Sc.

Slip stitch- sl st

Pattern

Allowing a long tail to secure clasp, Ch 2,

  1. Work a sc in the 2nd ch from hook (you can work additional sc to accommodate a button closure if needed) Turn

2. BCh, sl st to sc, turn

3. Bch, sc in base of the sl st (work over the slip stitch) turn

Repeat 2 and 3 until desired length.  (add extra chains if you want to create a loop closure)

Leave a long tail to stitch clasp, Cut and secure thread.

Weave in ends.

beadedcrochetflatweavecpr KarenGlasgowFollettDesigns 02/2017

Embroidering and Upcycling for the Holidays – Wreath


I will admit that I am a garage sale, estate sale,and auction addict. My love for fabrics and crafts provides fuel for that sales addiction. One of the ways that I rationalize my addiction is to believe that, with every purchase, I am saving items from becoming landfill.  The only problem with that rationalization is that by saving the earth from additional landfill, I am creating a personal landfill in my own home.

The creation of this holiday wreath is an example of how I am putting my collecting landfill to use and – in my mind – saving the planet by beginning the landfill reduction within my own home. (anyway, that’s my story and I’m stickin’ to it)

To create this wreath, I dug in to my collection of buttons, sequins and beads. I also unearthed some old stained damask napkins (you know … the ones that you find at estate sales where the proprietor always assures you that there are no stains on the carefully taped napkin bundle??? I fall for that hunk of malarky every time!) from the fabric stash. I also dug through the embroidery floss for some greens and some browns.

After starching and ironing a napkin, I discovered an area that was about 6 inches of stain free fabric. (use good light for this, some stains with not show themselves readily)  I found a 4 inch diameter circular lid that I used to draw a wreath base.

After hooping the napkin in an embroidery frame, I stem stitched in the brown floss over the wreath base line.  Varying the shades, I then used random fly stitching and back stitching to create the greenery of wreath.

Beginning with my focal point (which in this case was the rhinestone button) I overlaid and stitched buttons and sequins around the wreath.  (I used a North – South then East – West approach to better balance the design)

Since I decided that this upcycle was going to become a wall decoration, I needed a much more substantial drape to this piece.  So I used a combination of spray adhesive and a craft stabilizer sheet to give this piece the stability that it needs.

Circular items are so attractive, but circular frames are difficult to find.  You can always create your own by stitching you finished work to some plastic canvas, felt or other stable background. I have seen frames created from mason jar lids, embroidery hoops and and grapevine branches. Personally, I crochet, so I created the crochet frame that is shown with this wreath. The frame is available as a paid pattern in my ravelry or etsy shop  (links provided below)

As Creatives, we often find inspiration reading and seeing the projects that other people create.  Hopefully this little post inspires you to enjoy and create from your collection. Happy Holidays!

Links to frame patterns;

http://www.ravelry.com/patterns/library/circular-crochet-picture-frames

https://www.etsy.com/listing/494235227/crochet-circular-frames-crochet-pattern?ref=shop_home_active_1


Pumpkin Fairy Habitat

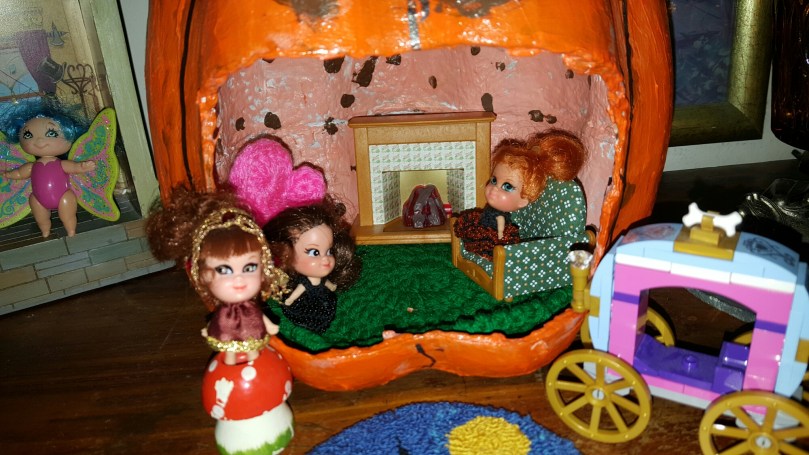
I collect Liddle Kiddle dolls from the 1960s. Some of my “rescue” dolls get rehabbed in to fairies for my granddaughter .  Well, these fairies  needed an autumnal home … and we made one. 

I’m not big with paying the going rate for the carvable craft pumpkins, so we went paper mache .  We (meaning my 6 year old granddaughter and I ) found a few paper mache pumpkins for under 5 dollars. I carved the opening with a craft knife. Then a few coats of gesso (don’t skip the gesso!) a coupla coats of acrylic paint and then a sealer and viola! A pumpkin cottage that any fairy would love to call home. The carpet is crocheted in worsted weight. The pink chair is the miniature doll chair that is a free pattern on my blog. The fireplace and the other chair are from the calico corners critter collection.

This was a great weekend project (with some drying help from the hair dryer) Excluding the dolls and the furniture, the cost of this project was well under 20 dollars. 

We wish you all a happy fall, a happy Halloween ,  a blessed Samhain and a glorious autumn full of fun and flavor! 💖

This is the first time that I have posted from my phone … hope the universe doesn’t implode when I  hit “send!”

Cross Stitch Sugar Skull

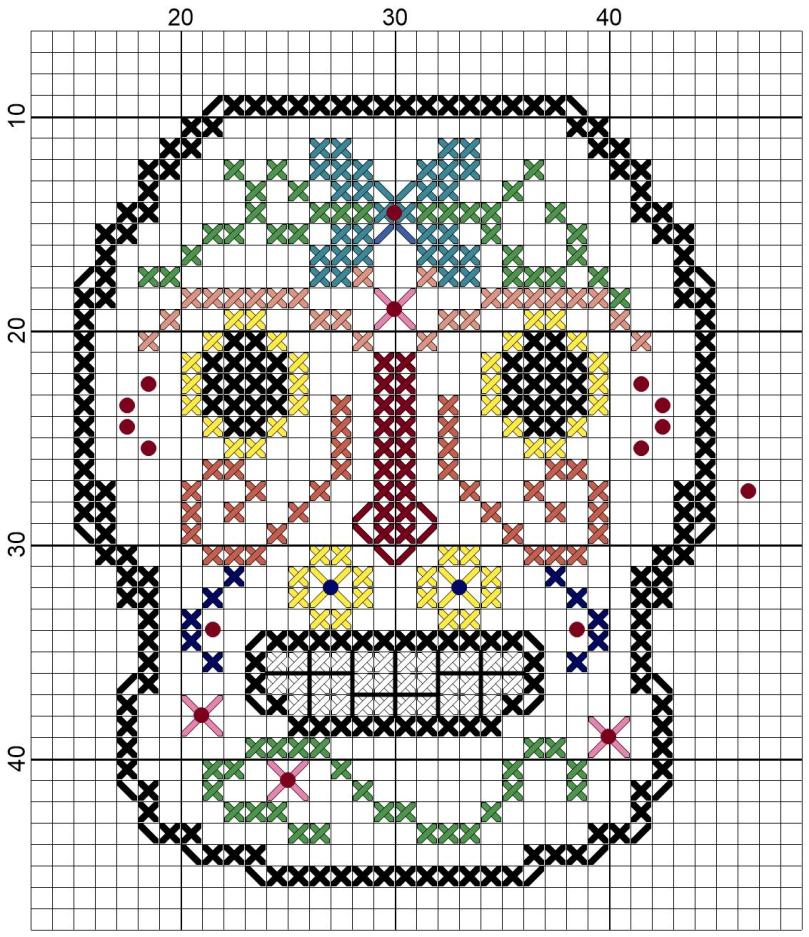
I am still experiencing my learning skill with cross stitch, so any charts that I “put out there” are going to be pretty simple. (which can be a plus, since you can make them quickly and while watching TV, etc)  When I drafted the colors of the chart, I was working on a white background.  HOWEVER, when I did the sample, I worked on a cream background.  No big deal, right?

As I worked the chart, I grew more and more disgruntled with the colors. Then I had one of those “duh” eureka moments! It was a big deal to switch from a white background to a cream background. I had to shift my color palate to complement the cream 14 count aida.  So if you notice the difference in colors between the chart and the finished piece – now you know the reason.

The crocheted frame is offered as a paid pattern. There are currently 3 size variations of the frames included in one pattern. The patterns will be available via my Ravelry, Craftsy and Etsy storefronts.

Enjoy!

sugar-skulls


Kansas City Royal Moon Cross Stitch Pattern

royalmoonWe love our Royals! Whether we are winning or allowing other teams to win, that Royal moon will forever shine over Kansas City.

I created this cross stitch pattern last summer.  I decided to post the pattern to my site for others to enjoy.  I’m pretty proficient at many forms of needlework …. but cross stitch is definitely not one of those forms.  So trust that this design is very simple.

The aida (I did this on 11 count with 3 strands of floss) was hand dyed using layers of blue acrylic dye that had been thinned with water.  This gives the aida a beautiful mottled effect. Please note that you can use dye or paint, but be careful that you don’t “clog up” the stitching holes of the aida.  (this is a more definite possibility if you are using paint)  After the aida is dry, iron with a very hot and steamy iron.

The floss colors that I used are black, white and gold metallic. To save the black ink of the printer, I created the chart showing the outlines of the skyline.  You can either keep this as an outline or fill in with stitches as I did.   The chart is included below. If you have trouble with the copy, please feel free to email me at underthemoon3@aol.com

Enjoy!

Karen

skylinekcroyals