I love hooped needleart. It’s casual. It’s beautiful. It’s expressive. But, sometimes, it can use a bit of “up – crafting.”
I recently saw an entire arrangement of hooped needleart. The designs were gorgeous and perfectly executed. But, it seemed disjointed … floaty. For my aesthetic, it was wanting some “look at me” element. It was wanting the perfect frame for the perfect art.
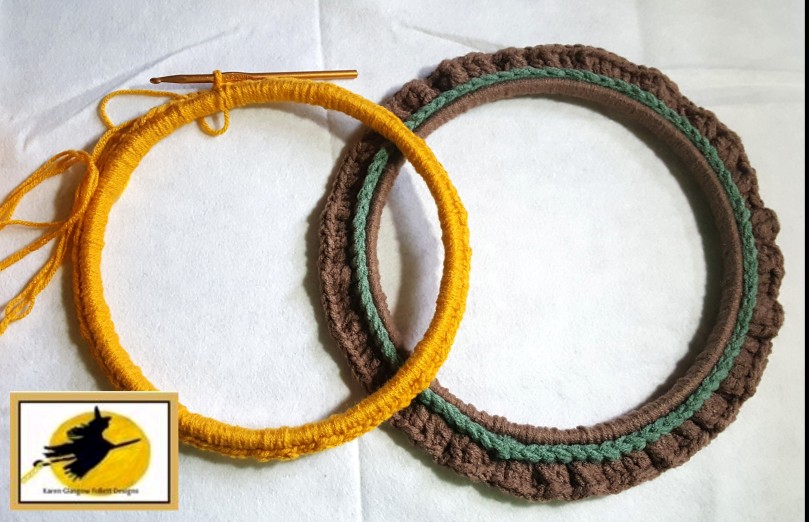
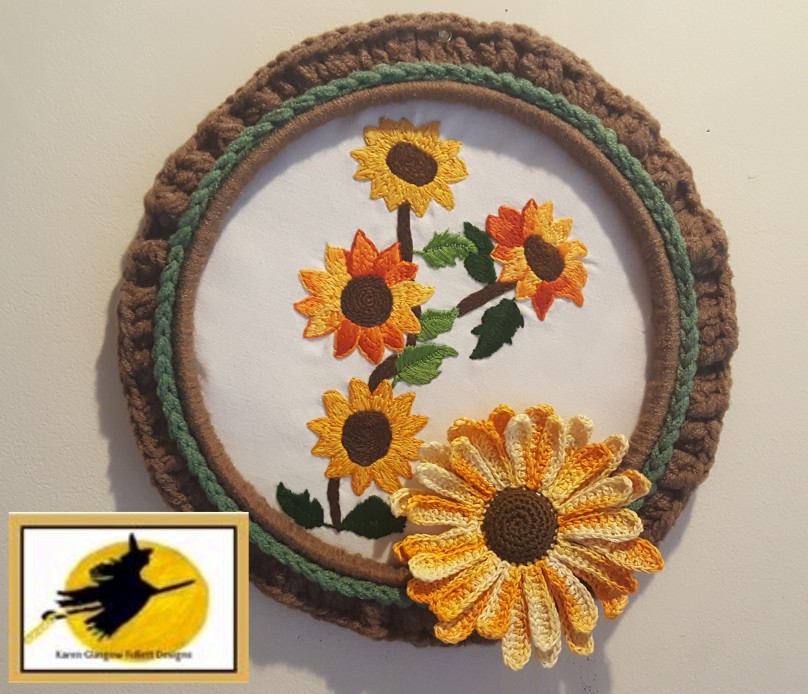
As an embroiderist, I have amassed a huge collection of wooden embroidery hoops. To begin this particular project, I selected a 10 inch hoop. (this is now a needlecrafted “wreath” on my front door, so I wanted a larger hoop) Taking 3 strands of worsted weight (4 weight) acrylic yarn and a 6.5mm crochet hook, I snugged as many single crochet stitches that would fit around this hoop. (as shown in both hoops)
Since this piece is on my white front door, I wanted a more “look at me” factor with the framing hoop. So after joining the last single crochet to the back loop of the beginning single crochet, I worked 2 double crochet stitches in the back loops of each single crochet around. I cut and secured the yarn to the beginning double crochet and hid the yarn ends.
To make the inner “mat” of the hoop frame, I attached 3 strands of green to a front loop of the initial single crochet round. I then made a single crochet in the front loop of each single crochet around. After securing, cutting and weaving in the yarn ends – this hoop frame was ready for it’s embroidered face.

Its just impossible to have an Autumn adornment without paying homage to the wonderful sunflower. (especially if you live in Kansas, USA – like I do) The pattern for the embroidery will be added at the end of this piece. The pattern for the crocheted sunflower is a paid pattern that is available on my Ravelry, Etsy or Craftsy site (links provided at the end of the piece too)
Personally, I like a nice and tightly woven Kona cotton for embroidery, but I have also been known to pick up linen and cotton napkins at garage and estate sales to use as embroidery backgrounds, Regardless of where I purchase and what I use, I begin by ironing the fabric and starching if needed. Using your hoop frame, mark the fabric “lightly” the circumference of the interior hoop. This gives you your design field. Transfer your design. You will notice that I drew each sunflower seperately. You can postition as you choose to create the design of your choice.
Using 6 strands of embroidery floss (DMC used for this piece) I worked the piece from the background to the forground. I used split stitches in browns for the branches. The leaves were done in closed fly stitches. The petals were done in long and short stitch. AND the flower face was done in a circular pattern of chain stitches. Block and press as needed
To finish – choose a backing fabric (I chose felt) Cut a size that you will be able to stitch or glue to the back of your hoop frame. (in this case, it was the size of a 10 inch dinner plate). Use an adhesive spray or a fusable to attach the embroidered piece to the backing fabric. Cut the backing fabric and the embroidered face to fit the hooped frame. Hand stitch or glue to the back of the hooped frame.
Since I wanted another layer of dimension, I crocheted the sunflower and stitched it slightly offside of the bottom of the finished piece. If you want to layer in this manner, but do not want to crochet, most craft stores are abundant in their stash of silk flowers that can be cut and attached.
Now you have the Hooped art that is completely original to you and your “multi – making” craft aesthetic.
Links to the crochet pattern
https://www.craftsy.com/search?query=karen%20glasgow%20follett
https://www.etsy.com/shop/MysticalCraftDesigns
https://www.ravelry.com/patterns/sources/karen-glasgow-folletts-ravelry-store/patterns
Sunflower Embroidery Pattern

cpr. Karen Glasgow Follett Designs 2018
