Crochet Bath /Spa Pouf Puff

50″ type=”rectangular”]

CROCHET BATH / SPA POUF PUFF

Karen Glasgow Follett Designs 2016

These crochet puffs are a generous size of 12 inches in circumference. The puffs suds up liberally with your body washes and bar soaps. And best of all – THESE PUFFS ARE WASHABLE!!! No more puffs that turn into shower science experiments!!!! Easy to create and great cotton stash busters!!!

MATERIALS NEEDED

1 ball (approx 2.5 oz) 4ply ww Cotton Yarn

Size “K” (6.5 mm) crochet hook

Tapestry needle to weave in ends

Safety pin or stitch marker

 STITCHES USED

Magic Circle – this is a method that creates a virtually “no hole” center. If you do not wish to do the magic circle, begin your work with by chaining 4 and joining to beginning chain with a slip stitch.

Single Crochet – Sc                                     

Double Crochet – Dc

Slip Stitch – Sl st

Chain – Ch

PATTERN

Work a Magic Circle or Ch 4 and Join to beginning ch with a sl st.

Ch 30 and join to the magic or ch 4 circle. (this create the hanging loop)

***Mark the beginng stitch of each round with a stitch marker***

Rnd 1, Ch 1, Work 25 Sc in the beginning circle. 

             Join to beginning sc with a sl st. Tighten circle

Rnd 2, Ch 3 (acts as first Dc)  Work 4 more dc in the same stitch.

            Work 5 dc in each stitch around. 

            Join to beginning ch 3 with a sl st.

Rnd 3,  Ch 3, Repeat Rnd 2.  Join to beginning ch 3 with a sl st.

Cut and secure yarn and weave in ends.

 witchtiny 128x160


 KarenGlasgowFollettDesigns 2016


Crochet Simple Spa Cloth Pattern

simplespacloth


Materials

4ply ww cotton 1 ball / skein

Size “I” (5.5mm) crochet hook

Tapestry needle to weave in ends


Stitches / Terms Used

Chain – Ch

Single Crochet – Sc

Ch – 1 sp, – Chain 1 space

Slip stitch – Sl st

Pattern

Ch 32

Row 1,  Sc in the 2nd ch from the hook and in each ch across. (31) Turn

Row 2,  Ch 1, Work a sc in each of the first 2 sc,  ch 1, skip next sc, *Work

                a sc in the next sc, ch 1, skip next sc* Repeat from * to * across

                to last 2 sc.  Work a sc in each of the last 2 sc.  Turn

Row 3,  Ch 1,  Work a sc in each of the first 2 sc, Work a sc in the first ch – 1 sp.

              *Ch 1, skip next sc, Work a sc in the next ch – 1, sp* Repeat from * to *

               across to last 2 sc.  Work a sc in each of the last 2 sc.  Turn

Row 4,  Ch 1, Work a sc in the first 2 sc, Ch 1, skip the next sc, *Work a sc in

               the next ch – 1 sp, Ch 1, skip next sc* Repeat from * to * across to

               last 2 sc.  Work a sc in each of the last 2 sc. Turn

Rows 5 through 30,  Repeat Rows 3 and 4.

Row 31, Ch 1, Work a sc in each sc across. 

Border

Without turning, Ch 1, Work 2 sc in the last sc of row 31,

Evenly space 29 sc along the side of the cloth to the corner,

Work 3 sc in the next stitch (corner made)

Work a sc in each of the foundation chains (29) to the next corner

Work 3 sc in the next stitch (corner made)

Evenly space 29 sc along the side of the cloth to the top corner

Work 3 sc in the next stitch (corner made)

Work a sc in each of the sc across (29) to last sc.  Work a sc in the same stitch as beginning sc of the border.

Slip Stitch in the beginning sc of the border,  Cut & Secure yarn, weave in ends.

 witchtiny 128x160 Karen Glasgow Follett Designs Cpr 2007 Recopied 2016

Crochet I – Cord Curtain Tie Backs Tiebacks

tieback1 tieback2

Materials Needed

4 ply WW Yarn of choice (you will be working with 2 strand together)

“J / 10” crochet hook 6.00 MM

Tapestry or other large eye needle to weave in ends

Double point knitting needle or other stitch holder (optional)

Tape measure (optional)


Stitches Used

Chain (ch)

Slip Stitch (slp st)


I – cord basics

To create crochet I- Cord

Make a foundation chain or foundation row of stitches,

Insert hook into the chain or stitch next to the hook, pull up a loop

Leave loop on hook

Repeat this process across the foundation. Number of loops on the hook should equal the number of foundation chains or stitches (ie: foundation of 3 chains or stitches = 3 loops on the hook)

Do not turn (the “right” side of the work is always facing you. As you work the I-cord, you will see that the work curves to the back to create the cord effect)

Working from left to right, carefully remove the loops and place on a double point knitting needle, stitch holder, ect, until 1 loop is left on the hook.

Work a chain with that loop

Leaving that loop on the hook and working from right to left, work a chain in the next loop

Leave that loop on hook

Repeat this process until all loops have been worked as chains. This constitutes 1 row / round of I-cord. You should end each row / round with a consistent number of loops on your hook (ie: if you started with 3 loops – you should end with 3 loops)


I – cord has an inherent elasticity. Many tiebacks are 25 inches long. You may want to shorten the length of your I – Cord to accommodate this elasticity. (The tiebacks in the picture are 22 inches)


Pattern;

With 2 strands of yarn worked together, chain 8

Join to beginning chain with a slp st to form a ring

Work a slp st into each of the next 5 chains

(this creates the hanging loop)

Work a slp stitch into the 6th chain, insert hook into the next chain and draw up a loop (2 loops on hook) Insert hook into the next chain and pull of a loop (3 loops on hook)

(this creates the I-Cord foundation of 3 loops)

*Do Not turn your work. You have 3 loops (left, middle and right loop) on your hook

Carefully remove the left and the middle loop (to stitch holder)

Chain stitch the right loop,

Leaving the loop on your hook, insert hook into the middle loop and work a chain stitch,

Leaving the 2 loops on your hook, insert hook into the left loop and work a chain stitch,

You should have 3 loops on your hook*

Repeat from * to * until you have your desired length.

Bind off with yarn over and draw through 1 loop, yarn over and draw through 2 loops, yarn over and draw through 2 loops until you have 1 loop on your hook (3 stitches)

Chain 5 and join to 1st stitch of the bind off with a slp st.

Turn, Work a slp st into each of the 5 chains

(this creates the hanging loop)

Join to the 3rd stitch of the bind off with a slp st.

Cut and weave in ends.


Karen Glasgow Follett 2014


Crochet Scrappy Log Cabin Throw / Afghan Pattern

Crochet Scrappy Log Cabin Throw / Afghan Directions / Pattern


Like many Multi crafters, I have a craft room that is filled to the brim with my hoarding of (ahem .. collection of) craft material.  Since my passion lies in the needle arts, my yarn stash quite impressively rivals many ancient monoliths.  (Yarn – henge is in my craft room)


This over amassing of yarn has caused me to restructure my priorities.  While I do deeply desire to be victorious in the “she who has the most – wins” competition; I also recognize the distinct possibility that I might fall victim to a yarn avalanche the next time that I open my yarn closet.  (but can’t you just imagine how great it would be to be rescued by an alpaca who has circular needles in his rescue kit?)


Of course the solution to this overcrowding is to find a project that will allow me to use the currently amassed skeins, partial skeins, balls and assorted tid bits of yarn henge.  And, of course, there is a plethora of patterns that will enable the yarn addict in this endeavor.  Many of these patterns range from the mile a minute strips to motifs, which are perfect for busting through stashes.  Unfortunately, as I perused the piles of patterns that call my craft room home, I did not find a pattern that gave me that “new project anticipatory tingle.”


Personally, I happen to love quilt designs.  I am NOT a good quilter, but I love to recreate quilt motifs and designs in crochet.  I DO NOT like to sew motifs.  I want a project that “grows as you go.”  So the log cabin seemed like a perfect project. 


As fortune would dictate; I found quilting log cabin patterns, knitted log cabin patterns and crocheted strip and seam log cabin patterns.  Among this pyramid of patterns was not one crochet “grow as you go” log cabin pattern.  My quick look on the internet yielded much the same results … I still couldn’t find THE Log cabin pattern.


Since necessity and impatience are the parents of design creation, I created my own pattern to meet my needs.   Please note that I am sure that these instructions are not new.  Their simplicity pretty much assures that they are a re-invention of a previous creation.

Also note that this creation is more of a set of directions instead of a traditional pattern.  Each crocheter can adjust the directions and create a pattern that can become a one of a kind personal creation.


Directions


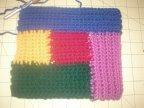
It is my understanding that, in traditional log cabin quilts, the center square reflects the heart (or hearth) of the home.  I chose a burgundy red as my center.  Also like a traditional log cabin quilt, each subsequent square or strip is built around this central hearth.


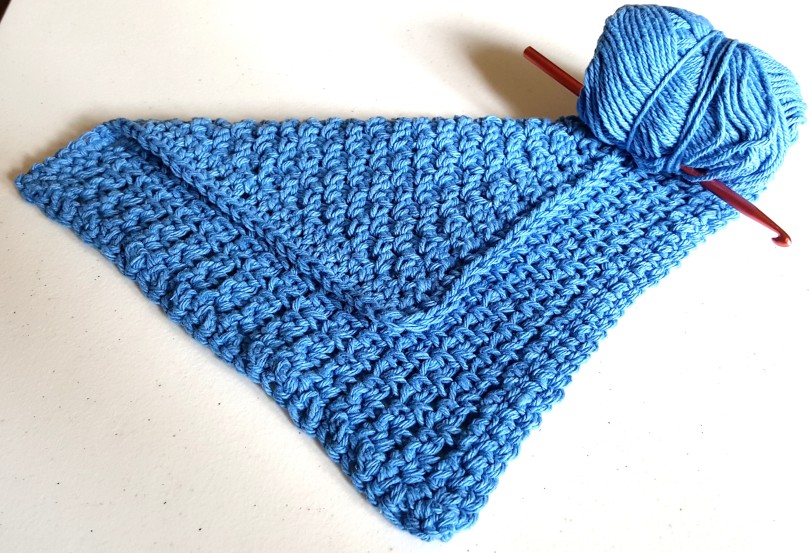
Feel free to use the picture as a reference.

The center square began as a ch 10.

Rw 1, Sc in the 2nd ch from the hook and in each chain across (9sc)

Rws, 2 through 9, Ch 1, sc in each sc across.

Do NOT cut the yarn at the end of row 9, but join a new color (in the picture this is yellow)


(you can adjust the start square to any size that you choose. I prefer working in odd number stitch counts and subsequent odd number row counts) 


Turn center (red) square clockwise so you will be working along the side of the center square.

Rw 1, Ch 1, Sc in the side of each row of center square (9) (working over the yarn tails of the new and old yarn will decrease the tails that need to be woven in. Cut center square yarn color when desired)

Rws 2 through 9, Ch 1, Sc in each sc across.

Join new yarn  (in the picture this is green)

Turn work clockwise (so you will working along the side of the 2nd square and along the bottom of the center square)

Rw 1, Ch 1, sc in each stitch across (18 sc) (with the addition of each strip or block, you will increase the amount of stitches across in increments of the beginning stitch count.  Since I began with a 9 sc block, I will increase 9 stitches with the addition of each new block / strip.)

Rws 2 through 9, Ch 1, sc in each stitch across (18)

Join next color (rose in the picture)


Repeat the last sequence

Add next color (blue in the picture)

Turn Clockwise

Rw 1, Ch 1, Sc in each stitch across (27)

Rws 2 through 9, Ch 1, Sc in each sc across (27)


Repeat the sequences of directions as you add to your log cabin throw until you reach the size that you want.  Work border as desired. 


2013 Karen Glasgow Follett


 log cabin sample